A video without media is nothing. The media, i.e., photos or video clips, are the basis of any well-made video. With ProVideo photo video maker, you can literally add/edit media as you wish!
ProVideo’s interface is utterly friendly to work with. It provides you the liberty to insert the media and experiment with it using different sets of features.
Let’s discover how you can add/edit media on ProVideo’s templates!
How to Add/Edit Media on Video Templates With ProVideo Photo Video Maker?
The process of adding and editing media on templates is divided into 3 simple parts. We will take you through each one by one for utmost clarity.
Part 1: Picking a Template
In order to add/edit media on a template, you first have to choose one.
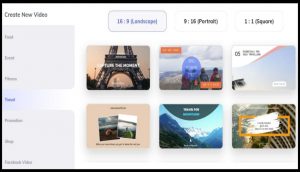 ProVideo Template Library
Here are the steps you need to follow to pick a suitable template:
1. Open the ProVideo iOS app or ProVideo Web.
2. Visit your Dashboard and click on ‘Start a new video’ to begin.
3. The ProVideo template library will then automatically appear on your screen. Select any template of your choice.
4. Next, name your project, select the right layout and click on ‘Use Template.’
5. Wait till the rendering takes up a few seconds. Once it gets done, you can add, edit, delete, or replace media on your selected template.
Part 2: Adding Media to the Template
Adding the media on a template in ProVideo is a simple process of a few clicks only!
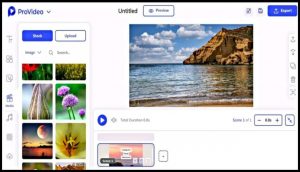 Adding Media on a Template in ProVideo
Follow these steps to insert media on your chosen template:
1. Click on the ‘Media’ icon.
2. You will then see a panel with ‘Stock’ and ‘Upload’ options. Click Stock if you wish to add a photo or video from ProVideo’s library. Browse through different available ones and select any of your choice by simply clicking on it. If you wish to insert any photo or video of your own, click on Upload and add any from your device’s gallery.
3. There you have successfully added the media to the template!
Part 3: Editing the Added Media
When it comes to editing the media that you have added, there are a wide variety of options.
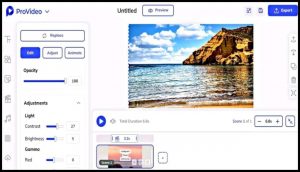 Editing the Media on a Template in ProVideo
Take a look at how you can edit the media on video template in ProVideo:
1. Click on any media out of those you have added and want to edit.
2. A panel with different editing options will then appear. Perform the editing using all the desired tools and features. Perform the editing using all the desired and required tools and features.
3. Done with everything, save the video either on your ProVideo Dashboard or export it to your device.
As mentioned above, while editing, you’ll come across different editing options. This is what each one lets you do:
- Replace: Changing the media with a new one at any point in time.
- Opacity: Managing how opaque or transparent you want any particular media to look like in the video.
- Adjustments: Handling the brightness, contrast, hue, saturation, tint, and all such qualities of a media.
- Filters: Enhancing the appearance of certain media by applying different effects.
And here we come to the end!
Isn’t it what we said at the start of this write-up – Add/edit media as you want with ProVideo photo video maker!
Have a shot at it yourself and you’ll know!